Check this out.

Sunday, May 30, 2010

American Honey


Scrap Kit : Memorial Day by the wonderful HellaSweet found HERE
Tube of Choice. I am using Ismael Rac's Locan found HERE
Eye Candy 4000 Gradient Glow 
 
 Open transparent image 500 x 500 and flood fill white.
C-N-P blue frame as new layer and resize by 50% position as shown. 
Repeat this step with the red frame.
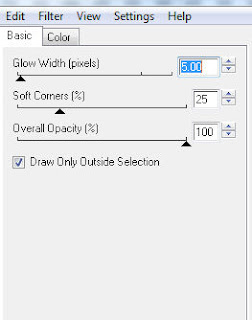
Add Eye Candy 4000 gradient glow with the following setting : 


I added this to both circles twice.
Rename your layers to RED and BLUE.

C-N-P tube as new layer and position waste behind the blue frame and hide.
Make BLUE layer active and with your magic wand tool select inside of the frame. 
Selections - Modify - Expand by 10 - Invert 
Make tube layer active and delete and select none. 
Make tube layer visible.
Repeat the tube/frame step but with her chest.
Merge the two body layers together - Duplicate and change blend mode to Luminance.
C-N-P red and blue drops as new layer and position behind frames.
Resize blue drops 85%
Add noise to both drop layers.
Gaussian  - Monochrome - 70%
Now merge your two drop layers and with your eraser tool erase inside the frames. 
C-N-P your tube as a new layer and position at the bottom of the frame.
C-N-P filigree 3 as new layer - flip - position as shown and erase any that is bleeding through the frames.
C-N-P filigree 4 - mirror - position as shown and erase any that is bleeding through the frame as well as the part that pokes out on the right. 
Merge all visible.   
Effect - 3D Effect - Buttonize 
W and H 3 - Solid - White - Opacity 100
Add all text and ©


Thursday, May 27, 2010

Rose Red

 Tube of Choice. I am using the art of Carol Barajas ... Group Permission only.

Scrap Kit : Blood Rose by the talented HellaSweet Grab it HERE
Plugins :  Gradient Glow Eye Candy 4000


  • New image 600x600
  • C-N-P frame 1 as new layer
  • C-N-P tube as new layer and position behind frame. I scaled to fit nicely inside the frame. Duplicate and change the top layer's blend mode to Multiply
  • Add gradient glow to your frame layer with the following settings :
 Color black


  • C-N-P blackwarebanner3 as new layer and position as shown.
  • Add gradient glow as before 
  • Add gradient glow once more but with the color #800000
  • C-N-P dreadrose6 as new layer and position as shown. Erase the top leaf. 
  • C-N-P dreadrose4 as new layer and resize 50% twice. Duplicate twice for a total of three images and position as shown. Add gradient glow. 
  • C-N-P blackwarescroll1 as new layer and resize 50%  position behind all layers and bunch of flowers as shown - duplicate mirror - merge down - duplicate flip.
  • C-N-P blackwarescroll3 as new layer and position on bottom layer - gradient glow

Add all © and text merge visible. 

Wednesday, May 26, 2010

Beach Babe


Tube of Choice - I am using the wonderful work of Jose Cano which can be found HERE
Template : Template 12
Filters : Gradient Glow Eye Candy 4000
Animation Shop


  • Open template
  • Image - Canvas size - 600x600 (will crop later if needed)
  • Delete template ©info
  • C-N-P paper 3 as new layer and position water so it will replace the black of the template.
  • Make raster 2 active (the black layer) - Selection - Select all - Float - Defloat - Invert
  • Make the paper layer active - Delete - Layers - Merge down
  • Take your crop tool and crop around the canvas to get rid of any extra. 
  • Duplicate your paper layer and change your top layer blend mode to hard light
  • Open paper 9 - Adjust -Add/Remove noise - Add Gaussian : 100 : monochrome
  • Repeat this step twice and copy. 
  • On your template layer make raster 4 active - select all - float - defloat- paste paper 9 into selection.
  • Repeat this step with raster 3
  • Select paper 7 and paste it into your tag. Position water over grey box or raster 5. 
  • Make raster 5 layer active - select all -float - defloat - invert -paper active delete. 
  • C-N-P your sand paper from before into raster 9.
This is what you should have so far.

  • Hide raster 3 (darker water)
  • C-N-P your tube as a new layer and position part of the body beneath the first square of the sand frame (raster 9). Hide the tube layer.
  • Make raster 9 active and with your magic wand tool select inside the first frame. Selections - modify - expand 2 - selections - invert 
  • Make raster 10 (tube) active - delete - select none
  • Repeat the body/frame step for the next two frames ...choosing different parts of the body. You may need to add a new raster layer in between each body layer, Merge three body layers down into one. 
  • Duplicate this layer (raster 10 or body layer) and change the top layer's blend mode to multiply. Merge the two. 
  • Merge copy of raster 2 and raster 2 down. Selection -select all - float - defloat -modify - expand 1 flood fill the two stars with a color of your choice or #35a396 - select none.
  • Repeat steps to the larger stars (8) #824d33
  • Add gradient glow with the following settings to both sets of stars.

  • Adjust - add/remove noise - add noise : monochrome, gaussian , 100 (both sets) now repeat the gradient glow once more to both sets.
  • Delete raster 7
  • Add gradient glow to raster 9 (sand frame and same settings as before)
  • Gradient glow on layer 2 and 4 but change the width to 2.00
  • Open element 45 and resize 70% ...make sure that all layers is deselected - position this layer beneath all others - add noise same as before.
  • C-N-P tube as new layer - position as shown - add gradient glow as before. 
  • C-N-P element 35 as new layer - resize 50% - gradient glow - mirror - position as shown 
  • C-N-P element 24 as new layer and position as bottom layer. This is what you should have so far.

  • C-N-P element 33 as new layer and resize 95% - gradient glow - position as shown
  • C-N-P element 17 - position behind all layers and resize 80% - gradient glow
  • C-N-P element 2 as new layer and resize 50% position behind shell layer as shown and duplicate 4 times and position 3 on the right and one on the left.
  • Take your crop tool and crop around the background layer. ...
  • New raster layer on the very bottom and flood fill white.
Now add your text and © and you are done unless you want to animate.

ANIMATION

  • Merge down all layers starting at the top until you reach the body layer (raster 10)
  • Skip layer 10
  • Merge all bottom layers
  • Open Animation shop 
  • C-N-P layer 10 as new animation 
  • Insert image effect with the following settings 

Customize


  • Delete the very last layer that has no animation on it. You should now have  a total of 6 frames.
  • Back in PSP copy your bottom background layer and paste into AS. Duplicate this frame for a total of 6 times and select all.
  • Propagate Paste selected 
  • On your body animation select all - copy - paste into your background frame. This may take a few time to line up so be patient. It is easier if you just make sure the right side lines up ok because the left is pretty much hidden. You may even want to merge the body layer down with the background layer before moving it to AS. 
  • Copy your top text layer and paste into AS. Save. :)

    Saturday, May 15, 2010

    SUPPLIES NEEDED


    Plugins : Alien Skin 5 - Impact , xero , eye candy 4000
    1. Open new blank image 600 x 600
    2. Selections > select all > c-n-p paper 2 into selection > select none  
    3. Open mask image > new mask layer > from image > 
      
    4. Merge group > duplicate your mask layer twice > merge visible

     5. Adjust > add/remove noise > add noise
     

    6. C-N-P tube as new layer > image > resize 75%


    7. Position as shown > effects > plugins > xero > soft mood > haziness and glow both 50

    8. C-N-P element1 as new layer > mirror and position as shown > erase the brown flower > effects > eye candy 4000 > gradient glow with the following settings ... 


    9. C-N-P ribbon 1 as new layer > resize 95% > position as shown > duplicate ... have one ribbon layer position below your tube and one above ... make sure your top ribbon layer is active and erase the ribbon over her hand.  

    10. Make your tube active and add a drop shadow to your liking.

    Ok this is how it should be looking if you could understand all my ramblings.


    11. C-N-P stichframe 1 as new layer and position behind all layers except the mask layer > add the same gradient glow. 

    12. C-N-P flower 7 > resize 65 % position to the left as shown ... now I just pushed that right corner a bit so it was a tad smaller ... > gradient glow. 

    13.  C-N-P flower 5 as new layer > resize 65% > gradient glow > position behind flower 7 and duplicate ... now mirror. 

    14. Add any text and all © information.


    Ok now if you would like to animate continue 
    Add a new raster layer and position on bottom > flood fill white > hide background layer and mask layer > merge all visible >make background layer visible > hide tube layer and mask layer > c-n-p background layer into animation shop > hide background and make mask visible > c-n-p mask layer as a new animation in AS > effects > insert image effect > underwater with the following settings :


    customize


    now make your last layer active and delete > edit > select all > activate or select your little Propagate paste icon.

    Now back in PSP background layer and mask layer should be hidden and your tube should be visible > copy merge > paste into AS > now you should have three different images in AS > On your animated mask image select all > on your white background layer duplicate this image until you have 17 frames ... should be about 5 times of hitting duplicate > now with your mask layer ... making sure the propagate paste is always selected ... on all steps here out .... select all on your background image and paste your mask layer into selected frames > repeat this with your tube image. ALL DONE ! SAVE !


    Monday, May 10, 2010

    Spring Has Sprung


    Paint Shop Pro IX
    Filters : Eye Candy 4000
    Font : Fiolex Girls

    Open a new image 600 x 600 w/ transparent background.
    Selections > select all > c-n-p paper 04 into selection > selections > select none.
    Layers > New mask layer > from image > MakeAMaskSpringMF01Slow2010 > Merge group.
    Duplicate this layer twice so you have a total of 3 > merge visible > rename this layer mask.
    Effects > Gradient Glow > 


    Use the default settings on all but the glow width under the BASIC tab.  Glow should be set at 3.00 >
    After you apply this repeat gradient glow but with the preset colors : pride.
    Open Tagframe 2 > c-n-p as new layer > Image > Free rotate, 90, right, all layers deselected.
    Position frame to the left and apply gradient glow with the following settings.


    Rename this layer frame > Hide Mask layer > magic wand : mode -replace, Match Mode - RGB Value, Tolerance - 50, Use all layers -deselected, Contiguous - selected, Feather 0 > New layer > Selections > Modify > Expand 25 > Click inside of frame >  C-N-P paper 25 into selection and move beneath the frame layer > rename paper > Select none.
    C-N-P layer1 of your psp tube and position in a nice spot behind frame > erase any extra so it is neat and tidy behind the frame > change the blend mode to luminance (L). > Rename Tube
    Now here comes the fun part ... me trying to explain in a way that you will understand. I hope you have done this before so it is not so complicated.
    You have your frame layer. C-N-P ribbon 9 as new layer and scale to fit so it looks like mine. Adjust and Add noise 55 - monochrome - random ... fit on the side of the frame. Add the gradient glow same as before to the ribbon and rename ribbon. Now duplicate your frame and position on top of ribbon so you have frame - ribbon - frame. Now with your eraser tool erase the left side of the frame. DO NOT erase the ribbon that is connected to the flower. With a smaller size erase around the frame ribbon. Now back to the easy stuff.
    Open bling 3 > C-N-P as new layer and move beneath the paper layer and to the right as shown > add the same gradient glow > resize 90 %
     duplicate > mirror.
    C-N-P flower1 > resize 50% > gradient glow and position behind paper layer as shown.
    Repeat with flower 2,3,4.
    Open doodle 3 > c-n-p > resize 50% > gradient glow > position as shown.
    C-N-P Raster 1 psp tube as a new layer > position as shown > gradient glow.
    Add © and any other text.