Scrap Kit : Tropical Island Dreams
Template : Template 12
Filters : Gradient Glow Eye Candy 4000
Animation Shop
Animation Shop
- Open template
- Image - Canvas size - 600x600 (will crop later if needed)
- Delete template ©info
- C-N-P paper 3 as new layer and position water so it will replace the black of the template.
- Make raster 2 active (the black layer) - Selection - Select all - Float - Defloat - Invert
- Make the paper layer active - Delete - Layers - Merge down
- Take your crop tool and crop around the canvas to get rid of any extra.
- Duplicate your paper layer and change your top layer blend mode to hard light
- Open paper 9 - Adjust -Add/Remove noise - Add Gaussian : 100 : monochrome
- Repeat this step twice and copy.
- On your template layer make raster 4 active - select all - float - defloat- paste paper 9 into selection.
- Repeat this step with raster 3
- Select paper 7 and paste it into your tag. Position water over grey box or raster 5.
- Make raster 5 layer active - select all -float - defloat - invert -paper active delete.
- C-N-P your sand paper from before into raster 9.
This is what you should have so far.
- Hide raster 3 (darker water)
- C-N-P your tube as a new layer and position part of the body beneath the first square of the sand frame (raster 9). Hide the tube layer.
- Make raster 9 active and with your magic wand tool select inside the first frame. Selections - modify - expand 2 - selections - invert
- Make raster 10 (tube) active - delete - select none
- Repeat the body/frame step for the next two frames ...choosing different parts of the body. You may need to add a new raster layer in between each body layer, Merge three body layers down into one.
- Duplicate this layer (raster 10 or body layer) and change the top layer's blend mode to multiply. Merge the two.
- Merge copy of raster 2 and raster 2 down. Selection -select all - float - defloat -modify - expand 1 flood fill the two stars with a color of your choice or #35a396 - select none.
- Repeat steps to the larger stars (8) #824d33
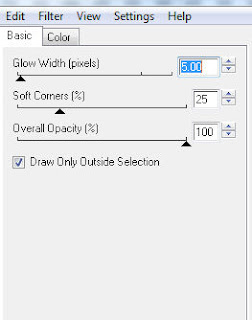
- Add gradient glow with the following settings to both sets of stars.
- Adjust - add/remove noise - add noise : monochrome, gaussian , 100 (both sets) now repeat the gradient glow once more to both sets.
- Delete raster 7
- Add gradient glow to raster 9 (sand frame and same settings as before)
- Gradient glow on layer 2 and 4 but change the width to 2.00
- Open element 45 and resize 70% ...make sure that all layers is deselected - position this layer beneath all others - add noise same as before.
- C-N-P tube as new layer - position as shown - add gradient glow as before.
- C-N-P element 35 as new layer - resize 50% - gradient glow - mirror - position as shown
- C-N-P element 24 as new layer and position as bottom layer. This is what you should have so far.
- C-N-P element 33 as new layer and resize 95% - gradient glow - position as shown
- C-N-P element 17 - position behind all layers and resize 80% - gradient glow
- C-N-P element 2 as new layer and resize 50% position behind shell layer as shown and duplicate 4 times and position 3 on the right and one on the left.
- Take your crop tool and crop around the background layer. ...
- New raster layer on the very bottom and flood fill white.
Now add your text and © and you are done unless you want to animate.
ANIMATION
- Merge down all layers starting at the top until you reach the body layer (raster 10)
- Skip layer 10
- Merge all bottom layers
- Open Animation shop
- C-N-P layer 10 as new animation
- Insert image effect with the following settings
Customize
- Delete the very last layer that has no animation on it. You should now have a total of 6 frames.
- Back in PSP copy your bottom background layer and paste into AS. Duplicate this frame for a total of 6 times and select all.
- Propagate Paste selected
- On your body animation select all - copy - paste into your background frame. This may take a few time to line up so be patient. It is easier if you just make sure the right side lines up ok because the left is pretty much hidden. You may even want to merge the body layer down with the background layer before moving it to AS.
- Copy your top text layer and paste into AS. Save. :)


No comments:
Post a Comment