Check this out.

Tuesday, June 29, 2010

A Moment in Time


Scrap Kit : Thoughts of Love. This beautiful kit by ScrappinDsigns can be found HERE
Tube of Choice : I am using the beautiful work of Anna Marine which you can find HERE
Mask 38 found HERE
Plugins : Eye Candy 4000 Gradient Glow and Alien Skin Xenofex 2 Constellation.
Open new blank canvas 500 x 500 - flood-fill white.
C-N-P Paper 16 as new layer - New mask layer - from image -WSL_Mask_38 - Merge group.
C-N-P flower heart frame as new layer and resize 60 % - all layer deselected - move towards the bottom just a smidge.
C-N-P tube as new layer and resize 90 % - add a drop shadow to your liking -Position in center of frame - duplicate - position one below the frame and one above - erase the tube of both layers on the bottom half only so it positions her bottom half on the inside of the frame and her top half outside.
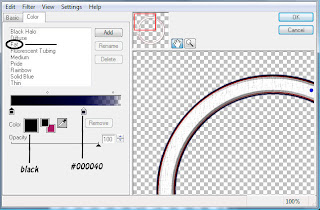
C-N-P tol light as a new layer - resize 50 % and position as shown - add gradient glow w/ the following settings. 

C-N-P tol_divider as new layer - resize 50% and position to the right as shown - Move behind all layers except mask layer - duplicate - flip - gradient glow
C-N-P tol_clock as new layer - resize 50% - position in top left corner behind all layer except mask gradient glow x2.
C-N-P tol_key as new layer - resize 50% - mirror and position as shown - gradient glow x3.
C-N-P pearl jewel as new layer and resize 10% - on this you can duplicate and position as shown or however many you like - gradient glow.
C-N-P tol_beads as new layer and resize 50% - position on the right as shown (behind all but mask) - duplicate - mirror - flip.
C-N-P curtain as new layer and resize 50% - position as shown. 
Add name or txt and all ©


Sunday, June 20, 2010

Harmony


SUPPLIES

Scrap Kit : Vantage Angel
Tube of Choice. I am using the beautiful work of Renee Biertempfel. Now I went through and tried to find this tube and couldn't find it. I am thinking her Ilana tube would also look nice.
Plugins : Eye Cany 4000 Gradient Glow and Xenofex 2 Constellation 
Animation Shop
Font : Tapioca
Open a new blank canvas 530 x 530 
Selections - select all - c-n-p paper 13 into selection - select none.
Layers - new mask layer - from image -Vix Mask 396 - Merge group - duplicate 2 times so you have a total of 3 mask layers - merge down - name this layer mask.
C-N-P tube as new layer and position in middle of canvas - add drop shadow : 0,0, 100, 10, black - repeat drop shadow.
C-N-P Rose 1 as new layer - resize 70% and position in bottom right corner - 
drop shadow : 0,0, 100, 10, black
Duplicate - merge down - rename this layer rose 1 - duplicate - flip - rename rose 2 -- make rose 1 active - duplicate - mirror - rename rose 3 - merge all three roses down and position behind tube layer.
C-N-P lisetescrap_painted flowers CU (1) as new layer and position behind roses.

C-N-P Butterfly 7 as new layer - resize 30% - free rotate 55 : right - Eye Candy Gradient Glow with the following setting : 


Add © and txt

If you wish to animate your tag please continue

Make your mask layer active - duplicate 3 times - rename these layers 1, 2, and 3.
On 1 add Constellation with the following settings :


Hide 1 - Make 2 active - Repeat this step on the next 2 layers but hit random seed each time.
Duplicate your white rose layer once - add constellation - merge down
Now hide layer 2 and 3 - copy merged - paste into AS.
Back in PSP hide layer 1 and make layer 2 visible - AS paste after current frame - repeat with layer 3
Save


Inked Beauty


Tube of choice. I am using the art of PinUp Toons
Plugins : Gradient Glow Eye Candy 4000
Mask : Vix Mask 333
Font : Tattoo Ink
Open new blank canvas 600 x 600
Selections - select all - c-n-p paper 22 into selection - select none 
Layers - new mask layer - from image - Vix_Mask 333 - merge group - 

EC Gradient Glow : 
COLOR - Fat - both colors set to black 
BASIC - width 3.00, soft 25, opacity 100, select draw only outside selection

Duplicate your mask layer and merge down - adjust - add noise : 60, Gaussian, Monochrome- duplicate this layer again - merge down - with your selection tool position your mask layer in the top left corner.
Duplicate this layer - mirror - flip - merge your 2 mask layers down - Rename this layer Mask
C-N-P Bling bracket as new layer - gradient glow same settings - Rename this layer as Mask
Hide your mask layer - magic wand - select inside the frame - selections - modify - expand 6 - new raster layer - c-n-p paper 23 into selection - position behind frame - selections none.
C-N-P your tube as new layer and position on the right and behind frame as shown.


Now with your eraser tool clean up the tube layer outside of the frame and change the blend mode to luminance - merge down.
With your crop tool crop select the entire canvas and crop getting rid of the extra tube layer.
Now c-n-p your tube again - keep its position -duplicate - gradient glow. Keep one layer beneath the frame and position one on top of the frame. With your eraser tool and your top tube layer selected erase the bottom part of the tube so the frame is visible - Make your bottom tube layer active and erase the bottom part of the tube that is on the outside of the frame.Now merge your top tube layer, frame, bottom tube layer, and paper down.


C-N-P splatter as new layer and resize 80% position in the empty area of the right corner - position the splatter layer beneath the frame layer.
C-N-P Rope as new layer - resize 60 and position at the  bottom of the frame and position beneath the frame layer. 
C-N-P cat as new layer and resize 40% position in bottom left corner as top layer and gradient glow.
C-N-P Screw as new layer and position as shown.

Gradient glow - duplicate - mirror.
Duplicate the screw layer and free rotate 90 to the left and position at the bottom, center of the frame - erase the top screw. 
C-N-P Blade as new layer - resize 25% - free rotate - 20 : right
Add all © and text.

Merge all layers visible

Wednesday, June 16, 2010

Americana


Scrap Kit : Americana by the talented Kittie
Tag of choice. I am using the beautiful work of Keith Garvey  Sparkle
Plugins : Eye Candy 4000 Gradient Glow
Mask : 396 by VIX

Open new image 600x600
Selections - select all
C-N-P paper 7 into selection - select none
Layers - new mask layer - from image - Vix 396
Make Mask Raster 1 layer active and merge group.
New Raster layer - Flood-Fill white and position behind mask.
C-N-P Frame 4 as new layer - Plugins - Eye Candy 4000 Gradient Glow with the following settings 

Glow Width : 3.00
Soft Corners : 25
Overall Opacity : 100
Draw only outside selection deselected.

C-N-P your tube as a new layer and position in canter of tag. I lined the top of her hat up with the top of the blue loop - Effects - 3D effect - Drop shadow 


 duplicate - position one tube on top of frame and one below. Now lets name these layers so we don't get all confused.

Top Layer =  T1
Next Layer = Frame
Next = T2
Next = Mask
Next = White

Now with your T1 selected and your eraser tube erase the bottom part of her legs  - repeat on the T2 
With your eraser tube selected and you Mask layer selected erase inside of your frame.
C-N-P Star Dangle 1 as new layer and position behind frame - duplicate - flip - merge down - erase Dangles around the frame - add gradient glow
C-N-P flower 1 as new layer and resize 20% - repeat this with flower 2 and 3 and position as shown - merge 3 flowers down and and gradient glow.
C-N-P Dragonfly 2 as a new layer and resize 50% - position as shown - drop shadow.
C-N-P Tag as new layer - position as shown - gradient glow.
C-N-P Word Art 2 as new layer and position as shown.
Add ©


Tuesday, June 15, 2010

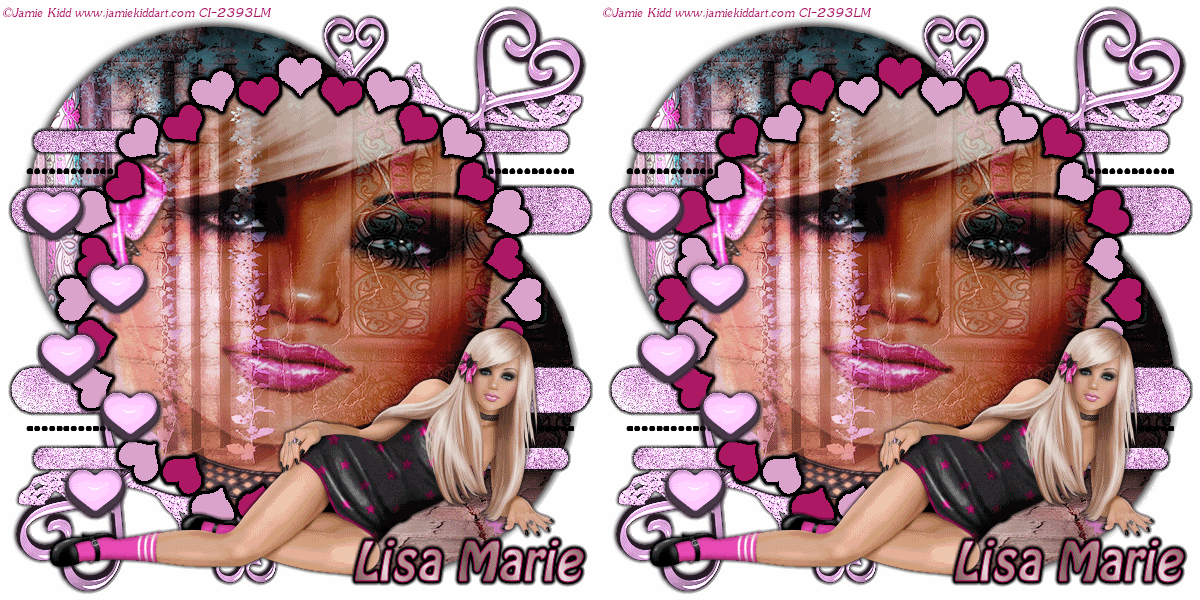
Pretty Pink Princess


Scrap Kit : COMING SOON - Punk Princess by Naughty's Creations. Please be sure to read her front page for exciting info.
Template : June 15
Tube of choice. I am using the beautiful work of Jamie Kidd : Tube 50-1

Open template - resize making sure it is set to pixles and all layers is selected - delete © info
C-N-P paper 5 as a new layer - make layer 1 active - selection -select all - float - defloat - selection - modify - expand 2 - selection - invert - make your paper layer active - delete - with your crop tool crop around the entire tag to get rid of any extra paper - add a drop shadow.
I used the following settings :
Repeat once more.

Merge paper down with 1 and rename paper 1 -C-N-P paper 5 as a new layer - make layer 4 active - selection -select all - float - defloat - selection - modify - expand 2 - selection - invert - make your paper layer active - delete- with your crop tool crop around the entire tag to get rid of any extra paper - merge paper and 4 and rename top paper - add Eye Candy 4000 gradient glow with the following settings :


C-N-P paper 8 as a new layer - make layer 2 active - selection -select all - float - defloat - selection - modify - expand 2 - selection - invert - make your paper layer active - delete - with your crop tool crop around the entire tag to get rid of any extra paper - merge down and name bar - gradient glow with the same settings as before  but change the width to 3.00 - repeat - adjust - add/remove noise : 60, gaussian, monochrome.
Now make your top paper layer active - selections - select all - float - add a new raster layer - C-N-P layer 3 of your tube into selection - select none - change the blend mode to hard light and opacity to 85.
Make layer 5 active - selections - select all - float - defloat - modify - expand 1 - flood-fill #ad1864 - selections - select none - add gradient glow 5x's.
C-N-P you layer 1 tube as new layer into your tag and free rotate 90 to the right.
C-N-P heart 4 as new layer and duplicate so you have a total of 5 - position as shown - merge hearts down and add a gradient glow.
C-N-P doodle as new layer and position as bottom layer ... well above the white layer - duplicate - flip - mirror - merge two doodles and add a gradient glow. 
Add © and any other writing you wish.
Now if you would like to animate your tag continue. 

Duplicate layer 5 - on your top layer five flood-fill one heart with #dca1c8 - repeat skipping one all the way around - hide top heart frame layer and repeat last step but start with the heart next to the one you filled first on the top layer. 
Now with your top layer still hidden - copy merged - paste into animation shop - back in PSP hide the bottom heart layer and make top visible - CM into animation shop. I kept all the default settings and saved.

Monday, June 14, 2010

Masquerade


Scrap Kit : Fairy Meadow by Naughty's Creations
Plugin : Eye Candy 4000 Gradient Glow
Open new blank image 600 x 600
C-N-P  Frame 06 as new layer - with your magic wand click inside the frame. Your magic wand settings should be 
Selection - modify - expand 24 
Add a new layer and c-n-p Paper7 into selection - position behind frame
Make your frame layer active and add EC 4000 Gradient Glow with the following setting 


Open tube and c-n-p Vintage Rose Alone layer as a new layer over in the tag.
Add gradient glow 2 times and duplicate this layer - position one layer on top of frame and one bellow the frame. On your top layer erase the wing and dress that overlap the frame.
Open your dust element and position in top left corner - duplicate - flip - merge 2 dust layers down - duplicate - mirror - position as bottom layer
C-N-P stars as new layer position below the frame but above the paper - duplicate flip - mirror
C-N-P doodle 7 as a new layer and position behind the paper layer and in the center - duplicate - flip - merge down - duplicate - free rotate 90 right - gradient glow.

Add your © info and any txt you would like.


Sunday, June 6, 2010

Dance among Faeries


SUPPLIES NEEDED

Scrap Kit: Naughty Angels  Fairy Meadow. 
She does amazing work!

Template 166 by Beth which you can find on her blog HERE. I think I have pretty much snagged most of her templates. I love them !! 

Eye Candy 4000 Gradient Glow 


Tube of choice. I am using the art of  Anna Marine. You can find her work HERE

Open template and delete all layers except :
White glitter frame, black frame, black circle, circle stitches 1, pink circle, circle stitches 2, white circle and oval.
Make your oval layer active - selection - select all - float - defloat - modify - contract 5 - c-n-p paper 10 as new layer - invert - make paper layer active - delete - select none - merge down - effects - edge effects - erode.

Make your top white glitter frame active  -  c-n-p frame 5 as new layer - delete white glitter circle and scale frame 5 to fit around the black circle as shown - add gradient glow with the following settings : 


Tuesday, June 1, 2010

Disturbed


Template :  172 ~ DO NOT DISTURB

Scrap Kit : Gothic Emotion found at http://lrcscraps.blogspot.com/ 

Tube of Choice. I am using the art of  Josh Howard titled Corset. This is a group only tube which is through Shewolfs Domain

Plugins : Eye Candy 4000 Gradient Glow. 

Open template
Shift + D
Close the original and delete the © layer.
Resize 550 x 517 all layers selected 
Open paper 3 and mirror image. 
Make circle 3 active - selections - select all - modify - contract 3 and paste paper into selection. 
Repeat this step with Paper 4 and Circle 4 but do not mirror the paper this time. 
Add a gradient glow to both circles. You can adjust the settings to your liking.
C-N-P your tube as a new later and position over black circle one. Position to your liking and hide tube layer. Make circle 1 active - selections - select all - float - defloat - invert.
Make your tube layer active and delete. 
C-N-P your tube layer once more and mirror. Position over black circle 2. Make circle layer active - select all - float - defloat - invert - tube layer active - delete.
Make circle one active - select all - flat - defloat - C-N-P paper 2 into selection - Select none. Repeat this step with circle 1 but use paper 1.
Change both tube layers blend mode to Luminance. 
Make circle frame 1 active - select all - float - defloat - expand by 2 - flood fill black - modify - contract by 6 - flood fill #42a3da or the blue from your color swatch - add noise : 100 : gaussian : monochrome.
Repeat these steps with circle frame 2.
Make blue line top active - select all - float - defloat - expand by 2.
Now for your foreground color ... open your color pallet up if you have not done so. Change foreground to  pattern and select your pallet.  Settings should be Angle 50 and Scale 38. I added a drop shadow to both pattern layers.
Make Word Art layer active - adjust - hue and saturation - colorize - Hue : 192 - Saturation : 255
C-N-P doodle 03 as new layer - resize  60% (make sure all layers is deselected.) Move behind word art - Add a gradient glow. Repeat this step with doodle 02 and position behind all layers but the bottom to circles.
C-N-P butterfly 01 - resize 50% and position as shown - gradient glow.
C-N-P ribbon 4 as new layer and position behind all layers except the bottom circles. Gradient glow.
C-N-P butterfly 01 and resize 59% position - gg.
Add text of choice and all ©.
SAVE